Banner

Orchard Girls
Showing posts with label Thrift Store. Show all posts

Monday, April 3, 2017

DIY At Home Preschool Learning and Activity Center

DIY At Home Preschool Learning and Activity Center by Orchard Girls Blog
     Our kids are about that age to start preschool, but we've decided to just do as much as we can at home, instead of sending them to a preschool. They have quite a bit of interaction with other children and I'm not worried about their social skills at this point. Since we moved into our new house we have enough space to set up a learning area for the kids. I had this idea in my head of what I wanted it to look like and I think its coming along pretty well.
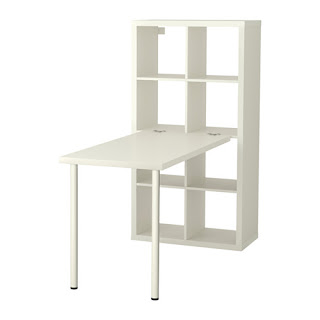
    I wanted to start off with the 2x4 Ikea Kallax unit and put it standing up. Next I wanted to get the Linnmon table attachment with legs to make a table space for the learning books and activities. Here is a breakdown of what I used:
--Ikea Kallax 2x4 System $64 (I found ours on the OfferUp app for $50)
--Linnmon Table Top $8.99 (they have several different table options, I went with the cheapest)
--Leg x2 $4 Each
This completes the set up of the table and storage area for the learning and activity center. You can also buy the complete set HERE. However, if you can find any of the pieces on a second hand app, like OfferUp for cheaper, do it!
DIY At Home Preschool Learning and Activity Center by Orchard Girls Blog
     Now  you can use any and all educational and learning materials and activities, and set them up on your shelf unit. They have a lot of different basket options if you want them all to be put away and stored. or you can lay them all out on the shelves, not in baskets. I went for laying them just on the shelves with no baskets. At least for now. Hah. I figure the kids will be more apt to sit up there and use the items if they don't have to get help to pull out the baskets and dig in the baskets to find things. Here is how ours has turned out so far...
DIY At Home Preschool Learning and Activity Center by Orchard Girls Blog
Abacus found HERE
Fraction and shape learning blocks found at Goodwill
Counting Color Connecting Blocks found HERE

     The top four cubes are set up with materials for my two oldest kids, ages 4 and 2. The bottom for are filled with fun little activities for my youngest (1 year old) to play with while her brother and sister are working on their activities. These two chairs I found at goodwill brand new in box for around $40 bucks! You can find them brand new HERE from Target.
DIY At Home Preschool Learning and Activity Center by Orchard Girls Blog
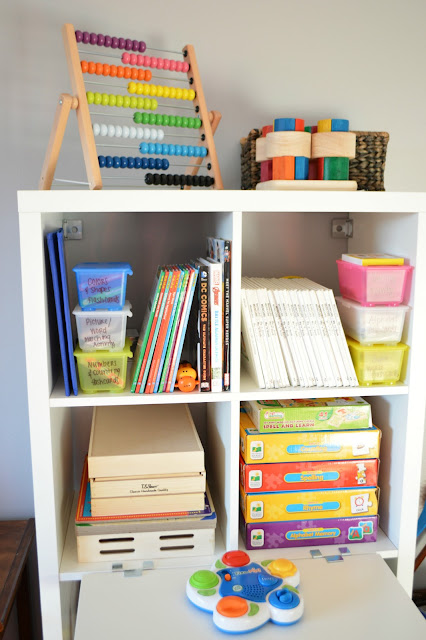
     Top two cubes are filled with educational books. Right side had the "My letter "A" book" going through the whole alphabet. I found all pictured here at Goodwill at a great price. On the Left we have some interactive monkey reader books. On the ends of the top two shelves I used the little storage containers from IKEA to put all our different flashcards and to organize them. 
DIY At Home Preschool Learning and Activity Center by Orchard Girls Blog
Colors & Shapes, Picture/Word Matchng Activity, and Numbers & Counting Flashcards
DIY At Home Preschool Learning and Activity Center by Orchard Girls Blog
 Spelling Activity, Alphabet Flashcards, and Sight word Flashcards
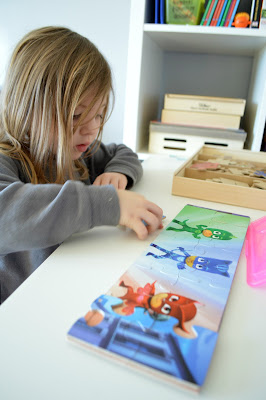
On the next two Shelves I have different puzzle sets. On the right I have other puzzles like, alphabet, rhyming, counting, and spell and learn activities. I found all of these at Ross Department stores for about $4 each. 
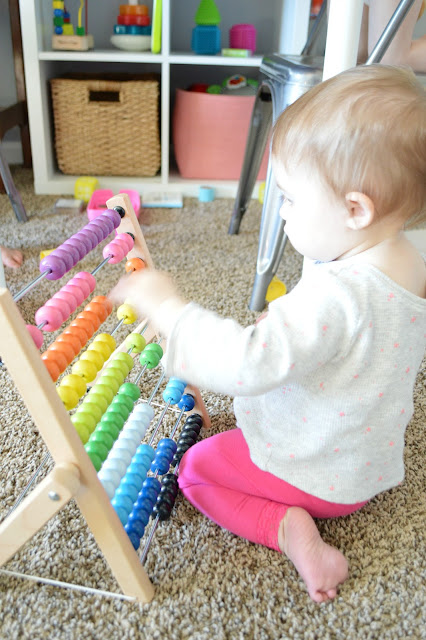
     On the lower four cubes I have things for my littlest to play with while her siblings are doing their activities.
DIY At Home Preschool Learning and Activity Center by Orchard Girls Blog

DIY At Home Preschool Learning and Activity Center by Orchard Girls Blog
We have only had it set up for a couple of days now, but the kids love it and have been constantly finding something to read or an activity to work on at their new preschool center.
DIY At Home Preschool Learning and Activity Center by Orchard Girls Blog
 DIY At Home Preschool Learning and Activity Center by Orchard Girls Blog

Even little Bethany is joining in on the fun! :)
Orchard Girls Blog

This abacus is one of my favorite learning tools right now. I got it at IKEA for $10 and its awesome! All the kids love. Its great because you can gear it towards any age. 1-2 years old fine motor skills and starting color recognition. 2-3 years old color recognition and counting skills, 3-4 counting skills and beginning preschool math skills. Plus its pretty to look at it! :) Thank you for checking out our new preschool learning and activity center! I hope you enjoyed it and got some inspiration to start your own!
--Kayla


Linking up at:
A Little Bird Told me Link Party

Friday, June 13, 2014

Benjamin's Nursery Reveal

I am so excited to share today's post! This little room has been such a labor of love. It has kept me quite occupied the last several months, and I think I can finally say that it's done! I absolutely love it and wish that I could move in there, too!

This will be a picture heavy post, but I will be linking several posts for individual projects I've done. All of those links will be at the end.

I would describe the theme of this room as rustic/woodsy/whimsy. I've incorporated several different themes, because I don't really like sticking to just one. I pretty much just used what I liked!

Also, you can see that I have revealed our baby boy's first name! I figured it was time, as there are some items in his room that have his name on them. :)
I'm sorry that I couldn't get more full pictures of the room. This room is tiny! Hopefully you get the idea of the layout.

Links to projects I've done:

Other nursery posts:

If you would like to know where something is from, just ask. I will reply as quickly as possible. I'd list everything in the room, but that seems like it might be a waste of time unless there is something specific someone is looking for!

I hope you all enjoyed and that you're having a great Friday! Have an awesome weekend :)

Linking to these parties.

Thursday, June 5, 2014

Thrifty Thursday: Dollar Store & Thrift Store Nursery Organization

Hello everyone. How are we all doing? I just woke up from a delightful 3 hour nap, so I figured it would be a good time to get a blog post done!

You all know I've been working on our nursery, and I figured it would be a good idea to share some of the organization I've done while being thrifty! First, here are some bins I found at the dollar store that I'm using to hold some of our baby's clothes.
We don't really have a dresser for clothes, but we have a large closet with shelves. I figured this would be an easy way to keep things organized. Each bin only holds onesies and pants/shorts for that size. I hang all shirts, jumpers, sleep & plays, etc. The little chalkboard labels are from the dollar bins at Michaels. In the picture above, you can see that I'm hoping our baby boy will be here before the 4th of July!

Next up, I've organized our changing table with thrift store baskets.
We're going for a more natural/woodsy vibe in here, so the mismatched baskets don't bother me. Plus, I think they will be very versatile as the baby gets older & we transition to cloth diapers. 

That's it, folks. I hope I gave someone some ideas for their own nursery. I find it hard to spend a lot of money on things for this room, as I know it will only last for a short period. I'm hoping to get this room done 100% soon, then I can do a nursery tour for you guys :)

Have a great & thrifty day!

Thursday, May 22, 2014

Thrifty Thursday: Dollar Store Instagram Photo Display

Hello everyone! I have a really fun project to share with you today for Thrifty Thursday. I ordered some of my instagram pictures a few weeks ago and have been trying to decide what to do with them. If you're curious, I ordered them through Social Print Studio. They are very high quality, and I'm in love with them.
Basically all I used was:
-an old white frame
-dollar store laundry string
-dollar store clothes pins
-hot glue gun

And all I did was:
-place pictures where I general wanted them
-cut the laundry string to the right length
-glued clothes pins to string first, then glued the string to the back of the frame
Pretty quick and easy. Now I have a cute place to hang my pictures! I plan on changing them out often. Do you guys print your instagram photos? How do you display them! I'd like to know.

Have a great Thursday, and do something thrifty!

Friday, May 2, 2014

Hanging Wooden Photo Frames with Burlap

Happy Friday, everyone! I whipped up a little project for the nursery the other day and thought I would share.

I bought these small wooden frames from the thrift store a while back (mentioned in my Thrifty Nursery Finds post), and hadn't found a way to use them until recently. Since then I've seen these same frames at Joann's for the same price. I thought it would be fun to put pictures of our little family in there with each members name- that includes our doggies! Instead of hanging them all individually, I hung them all together using a roll of burlap.
Here is what I did:
1. Gathered my supplies. My frames (with pictures & names, I just used some letter stickers), roll of burlap ($5 at Walmart), scissors, and staple gun.
2. I folded the top of the burlap over for a bit more support and started stapling.
3. I continued down on each frame, 3 staples on top and bottom. I used my camera lens cover as a guide for spacing between frames.
4. I cut the end up the burlap into a little flag.

Ta-da! I think it turned out so cute! You can see that it ended up being pretty long. I can't wait to hold my little baby boy and point out each of our family members to him.
Kind of ties in our yellowish light switches, eh?
Our nursery is coming right along. There isn't much more to do except little projects here and there. It's working out well for me because I'm pooped! I'm sure that I will do a nursery reveal post once everything is complete and it is closer to our little man's arrival.

Hope you guys have a fabulous weekend and we will talk to you all next week!

Linking to these parties.

Thursday, March 13, 2014

Thrifty Thursday: Another Thrift Store Tray Redo!

Happy Thursday! I did a project last week that I thought I'd share with you guys. I did this for my Mom, as she wanted a tray to put on her coffee table. She likes french country sort of stuff, so I decided to paint a tray with a floral/bird design. But first, it looked like this.
Sorry for the poor quality phone photo. I just took this to send to her, I didn't think to make a post about it until after it was finished. You can see a lovely family of geese here. Not really Mom's style. So I taped off around the border that was already there, and painted over the geese. Once that was dry, I got to work on the actual floral/bird design. Here is how it turned out.
My bird is a little chubby, but that's okay. More endearing, right? I just used my acrylic paints to do this. I still need to put a coat of poly or something over it, so she can use it for food and the like. What do you guys think? I think it looks pretty good for a $2.99 tray.

Since the weather has been nicer, and it has been staying lighter longer, we have been trying to go on more walks. It's getting harder and harder with this growing belly, but I still need my exercise! I just need a few more breaks when walking up the hills. :) We made it to the top of our favorite little hill behind our house. There were some coyotes calling in the distance, and our dog Bella was listening very intently. I captured this picture of her face and just love it. I love her eyes and the fact that her lip is stuck on her bottom teeth. She is such a beautiful Chocolate Lab, and the color of her coat looks especially nice in the sunset light.
I hope you all are doing well. I won't be back until next Wednesday, so I will wish you all a happy weekend now. Thank you for all of your support :)

Thursday, February 13, 2014

Thrifty Nursery Finds

You guys know that I've been working on our nursery. I can't seem to get it off my mind! I tend to be a bit obsessive about these things, staying up at night thinking about furniture rearrangements. Anyway, I've been on the look out for some cute personalized things to spruce up the nursery, but haven't really been buying anything. I picked up a few things the last couple of days purely because they were a steal.

First I got this little wire owl from a local thrift shop for $2.99. He was just too cute.
From the same store, I found these natural wood frames (all brand new and wrapped in plastic). They were marked at $1.99, but they were 50% off today, so I only spent a dollar on each. I figured I could do a lot with these. My mom suggested staining them, or painting them. Who knows what I will end up doing. I quite like them the way they are.
And finally, I found a rug! I've been eyeing the rugs at Urban Outfitters, but couldn't spend the 70ish dollars just yet. Then, Kayla and I were at Ross and I came across this beauty! It is similar in texture to the Urban Outfitters rugs, and can be washed in your washing machine! BUT, this 5'x7' (shows up how small this nursery is) was only $27!
Looks like I may need to do a bit of ironing, and take the tags off! I did have to get some rug pads to go underneath this.

You can see that I have already rearranged the room since my last nursery post on Tuesday. Yep, thank you, insomnia.

I hope you all are doing well. Our snow is melting and we are in a big slushy mess right now. Hopefully the sun will stay out and dry it all up. Have a great rest of your Thursday!

Thursday, February 6, 2014

Thrifty Thursday--Chevron Tray Redo

Good evening! Getting the post up a bit late today, but I pulled off a one day project that I'm pretty pleased with. It has been snowing off and on all day today. I mean, we've only got about an inch or two...nothing compared to what much of the rest of the country is dealing with. 

Anyway, Kenzie and I ventured out to do some thrifting! Goodwill is having a sale til February 9th here, all books 50% off. I ended up getting a few fun board books for Adeline. I also got a large toy basket ($6.00). Lastly, I got this fun tray!
Now, it doesn't get much easier than this. The chevron print was already on this tray. I actually think it looks good just like this, but wanted to do something a bit more, just to update it. I decided to paint one of the alternate stripes white. Then I also painted the sides and handles white. After that I noticed the paint was really chipping off quite easily. I decided to use some clear mod podge to seal the surface of the tray. While doing that, I added some yellow scrapbook paper to the handles for a pop of color. This project cost a whopping $1.99! Here is how it turned out.


What do you think? I think it turned out pretty good, I'll have to figure out a "home" for our new tray! What thrifty projects have you completed lately? I'd love to hear about them! :)
We link up to these parties HERE!

Pinterest

Related Posts Plugin for WordPress, Blogger...