Banner

Orchard Girls

Tuesday, April 30, 2013

DIY: Personalize a Recipe Box

Hey all! I hope you enjoyed Kayla's post on making your own personalized bunting! I know that I will be making some whenever we are blessed with a child. Shoot, I may whip some up for Bella's dog kennel.

Today, I'm going to share a really quick project with you. When I received my very first recipe box in the mail via etsy, I knew I needed to make or find some dividers for the recipe cards. As the true art-store-addict my husband thinks I am, I decided to make my own.
The only things you'll need are: recipe box, scrapbook paper, scissors, a ruler, stickers (optional), and notecards.

You will have to measure how tall your box is, so you don't make the dividers too tall. You'll also want to make sure there is enough of the divider showing above the notecards that you can read the categories. Once you've done that, you can start cutting your dividers. I decided to cut mine twice as long so I can fold the card over. This comes in handy when I need to save my place while going through my recipe cards. 
Next, you just need to decide what categories you will need and write them on the dividers. I wrote mine on some little heart stickers I found at Michael's. I believe they were from the Martha Stewart scrapbooking section. The categories I have are: Appetizers & Snacks, Main Dishes, Side Dishes, Desserts, Breads, and Beverages. I have one empty divider that I keep blank notecards behind.

And that's it! Now you have some cute dividers that fit perfectly in your recipe box. The hardest part, like Kayla said yesterday, is picking out the paper. :)

I hope that you are all having a great week, and I will be back again tomorrow to share my salsa recipe-- in time for your Cinco de Mayo celebrations!


Monday, April 29, 2013

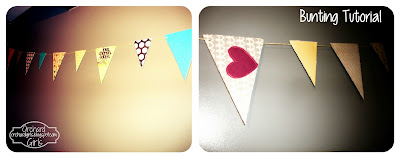
DIY: Bunting Tutorial/Nursery Pictures


“Bunting” seems to be really popular right now, and why not? It’s super cute! When I had found out that I was having a girl, I couldn’t wait to go out and pick cute patterns for a DIY bunting project. It was really easy too!
Items Needed:

-Scissors

-Cardboard 
-Various scrapbooking papers
-Paper Glue
-Single hole puncher
-String or Ribbon


First thing I did was go to our local Craft Warehouse, there I found, already cut bunting triangles. It would be just as easy to cut out your own from cardboard (cheaper too!). 
Anyway, whichever you decide the next step is the fun part! Pick out various coordinating patterns of scrapbook paper. I think that step took the longest! So many to choose from…
Take the scrapbook paper, and using the cardboard triangle as a template, draw round the triangles and cut them out. Next you’ll need to match up the scrapbook paper with the cardboard and apply it using paper glue. After that you’ll need the hole puncher. Punch two holes on the small side of the triangle, one on each end. Now you’re ready to feed your string/ribbon through the triangles, making it as long as needed. 

The picture below is actually a bunting project that my friend Alexis did for Addie's baby shower. She did a similar method, however she did it without cardboard backing and ribbon instead of string. Works just as well, and still super cute!
    Thanks for reading, I hope you found this tutorial helpful. There are so many different/fun ways of creating bunting! Please feel free to share any ideas or tips you might have tried. 
--More Nursery projects coming soon!--
There is our little Addie girl at 2 months old. Today she will already be 5 months old! She is growing up so fast. I can't believe she has almost been here for 1/2 a year. Funny thing is, we haven't even moved her to her actual room yet. So she hasn't been able to enjoy all her fun decorations. I think we will start transitioning her into her crib at 6 months. I'll keep you updated on that.
I hope you're having a wonderful Monday,

Friday, April 26, 2013

Fix it up Friday: Hub of Operations

I don't know about you, but our house always seems to have papers floating around. Some on the desk, on the coffee table, kitchen counter or table. I was tired of my husband coming home and asking where things were. So, I decided we needed a central location where we could keep all of those little things that seem to walk off on their own. Introducing our Hub of Operations!
Our kitchen/dining room seems to be the place we come first after entering our front door, making it the perfect location for my new hub (not meaning husband, just so we're clear). As a bonus, there was this little bit of wall that just "needed" something.
We were lucky enough to score a hand-me-down dresser from Adam's parents. It was passed down from Adam's great grandmother. It is yellow and chippy and oh so cheerful.
I decided to add a basket as a "catch all" for mail and loose papers. Once a week, I go through the stack and discard or file anything that needs to be moved out. I also added a jar for pens and notepad for quick note taking.
I haven't completely filled all the drawers yet, but have filled one of the smaller drawers with all the little things that seem to lose themselves. I had some old pickle jars that I used to hold pens, etc, that fit perfectly. Now everything we need is on or in this wonderfully happy dresser, instead of strewn about our home or taking up priceless kitchen drawer space.
I hope you enjoyed this quick little update to our kitchen. Having things organized helps life remain simple, and keeps anxieties at bay. If you have a problem with floating mail or papers, I definitely suggest creating a space for keeping them. Now, when hubby can't seem to find something, I can just tell him to look in the basket! 

Hope you are having a beautiful day!

Thursday, April 25, 2013

Thrifty Thursday: Thrift Store Finds + Online Deals

    We had high hopes yesterday that we would find some awesome deals at our local thrift stores. Neither one of us were quite thrilled with the selection, but we "thrifted" on! We ended up finding a couple of fun things. 
      Two of my favorite finds were these storage jars ($1.99 & $2.99) below and this really cool homemade blue mason jar lamp ($2.99). 


We weren't even sure that the lamp would work, but I found a bulb, plugged her in, and VOILA it worked, so that was a plus. Also, we thought it was cool because you can actually take the lid off and fill it with whatever you'd like. 

Since it is "Thrifty Thursday" and you won't necessarily be able to get the same deals we found at our thrift stores here are some you CAN take advantage of!

 Online Deals:
1. FREE awesome fonts at Lil Luna 
2. FREE Products Monthly at: FreeFlys
3. FREE printable Pantry Labels at: FabnFree

Mommy Deals:
1. Free Breastfeeding Cover-up. You only have to pay Shipping ($12.00)
    Go to: Udder Covers and enter promo code: ENBABY

2. Elmo's Learning Adventure Kit (+free Elmo Backpack) only $5.95 for shipping!
     Go to: Elmo Adventure Kit


I hope you're having a great day,

Wednesday, April 24, 2013

What We Eat Wednesday: Feeling Clammy

Welcome to our very first What We Eat Wednesday! Last night, I decided to make a recipe that I received from our favorite mother-in-law. Say hello to Seashells with Creamy Clam Sauce. This is an easy weekday meal that leaves plenty of leftovers.
Ingredients:

1 lb pasta of choice
2 tbs butter
1 cup sliced celery
1 cup sliced fresh mushrooms
1 clove minced garlic
2 tbs flour
2 cups milk
2 cans drained chopped clams
2 tbs fresh parsley
1/4 tsp onion powder
salt & pepper

Directions:

1. Heat a pot of water to boiling and add pasta. Return to a boil and cook until noodles are done, approximately 6 to 8 minutes. Drain.
2. Melt 2 tbs of butter in saucepan, add your celery and mushrooms. Saute until soft. Be careful to not knock any mushrooms on the floor unless you have your own personal vacuum cleaners.
3. Add garlic and 2 tbs flour, stir until well mixed and then add 2 cups milk. Stir constantly until sauce thickens, making a white sauce. About 5 to 10 minutes.
4. Add your 2 cans of drained clams, 2 tbs parsley, and onion powder. Salt and pepper to taste. Mix well. Serve over pasta.
I served this with a baby spinach salad, and fresh baked bread (the take and bake kind!).

I hope that you enjoy this recipe if you decide to give it a try!


Tuesday, April 23, 2013

DIY: Canvas and Mod Podge Project!

**EDIT: 6-25-13** Here is what I ended up doing with these Mod Podge Canvases...


It's nap time and I have about 20 minutes left! Let's see if I can complete our first DIY post.
This project is essentially taking scrapbook paper and using mod podge to apply it to a blank canvas!

Step 1: Choose your scrapbook paper and cut it according to your canvas size. I cut mine about 1/2 inch shorter all the way around, so a bit of the canvas would show.
Step 2 and 3: Choose any color of paint you'd like to paint the sides and whatever may be showing after the paper is applied to give it a pop of color!
Step 4: Using a sponge brush, apply the mod podge to the back of the scrapbook paper. Make sure you do this quickly because it drys really fast.
Step 5: Once it is all applied to the back flip it over and press it onto the canvas, using your fingers and the palm of your hands put pressure on the paper, and smooth over it for a few minutes.
Step 6: Once you've smoothed it out, flip it over and apply pressure to make sure you don't end up with air bubbles. (I used cook books, but anything will work!)
Step 7: Use mod podge to paint over the entire front of the canvas. Once that is done you can flip over onto a sheet of wax paper (so it doesn't stick to anything) and apply pressure again while it is drying.

Here are my results!

If you complete this project let us know how it turned out, and post your results below! We'd love to hear from you.
Hope you enjoyed this project! Stay tuned...many more to come!

Hope you're having a great day,


Pinterest

Related Posts Plugin for WordPress, Blogger...