Banner

Orchard Girls

Friday, September 27, 2013

Free Printable Orchard Photographs

Happy Friday! I don't have any projects to share with you all today, but I do have some photographs that I took on the orchard this week. I've been using my cell phone for all of my pictures the last couple of months, so I'm happy to say that we finally got a new camera! I've been taking lots of walks and testing it out. 

These are my mums that sit on our front porch-
click here to download
And here is a picture of the praying mantis that lives underneath the mums. I apologize to those who are creeped out, but I think he's cute!
click here to download
We also have some roses that are starting to bloom again.
click here to download
This 1950 Allis-Chalmers tractor was in our yard the other day.
click here to download
Here are some photos of the Pink Lady apples that are behind our house.
click here to download 
click here to download
And finally, I walked up the hill near our home, and caught this picture of the rainstorm moving and Mt. Adams in the distance.
click here to download
So, there you have it! I'm sure I will be exploring more with my camera, and I'll be sure to share the journey with you all. We hope you have an awesome weekend, and we will be back with a post on Tuesday!
Check out the linky parties we link to by visiting our Link Party Directory.

Thursday, September 26, 2013

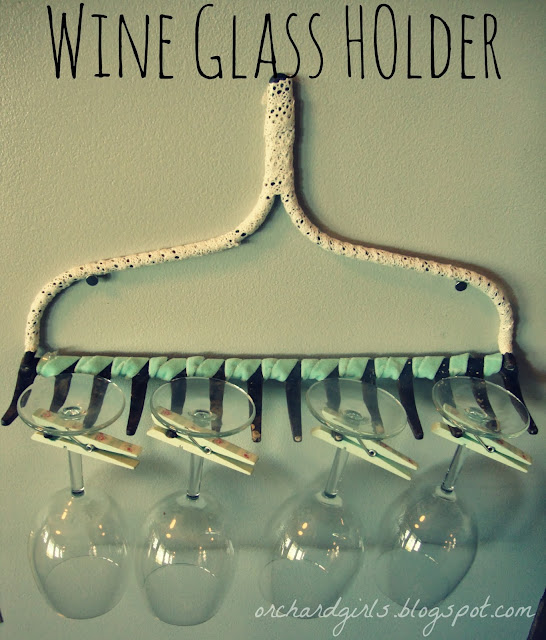
Thrifty Thursday: DIY Wine Glass Rack!

Good morning, how are you doing today? Wonderful I hope! It's almost the weekend and I have the perfect quick, fun, easy, and THRIFTY weekend project for you! All you need to do is find one of these bad boys...
DIY - Wine Glass Rack by Orchard Girls
I found mine at a local Vintage flea market a couple of weeks ago. I was so surprised when I found it, I went out that day with this on my mind - thinking it is all I wanted to find, and I found it! That never happens! :) Anyway, it was only $3.00. Next I purchased a few of these from Michael's a couple of weeks ago, not really sure what I wanted to use them for, but I knew they would come in handy. They were 50 or 60% off, I believe! So they ended up being about 50 cents per pack.
DIY - Wine Glass Rack by Orchard Girls
Now I used the two that the arrows are pointing to, to decorate my wine glass rack. You could really use anything - ribbon, twine, burlap strips. Whatever you'd like.
DIY - Wine Glass Rack by Orchard Girls
Now, originally, I was going to paint or spray paint the tool a solid color, but I decided to skip that step and just add these embellishments. It covered most of the imperfections and added some uniqueness! 
DIY - Wine Glass Rack by Orchard Girls
 So, I hung it up with two nails, one on each side. It is pretty sturdy, but I still felt nervous about the glasses falling off somehow, especially with a little one, who will soon be running around (running into walls-im sure).
DIY - Wine Glass Rack by Orchard Girls
 I decided to attach these clothespins , I thought they were cute enough to leave on and ensured the glasses wouldn't accidentally fall off. I got these a Michael's too - in their dollar bins.
DIY - Wine Glass Rack by Orchard Girls

DIY - Wine Glass Rack by Orchard Girls
So there you have it, my quick and thrifty Wine Glass Rack! What do you think? Let us know in the comments down below :) Have an awesome day!
Be sure to stop by our Link Party Directory Page to see where we "party"!

Wednesday, September 25, 2013

WWEW: Ziti Lasagna Bake

Hey everyone! I have another "winner" recipe to share with you all today. I made this for a family dinner last Sunday, and it was a big hit! This is another adaptation of a recipe I found on allrecipes.com.  I've made several changes, so I will share exactly what I did, as I think it added quite a bit to the overall flavor.
Here are the ingredients I used:
-1 lb ziti noodles (my bag was actually 17.9oz-- and it was perfect!)
-1 lb lean ground beef (or turkey, zucchini, chicken, whatever!)
- 24 oz tomato sauce
- 24 oz tomato puree
- 2.25 oz can of chopped olives
- 4-5 chopped fresh mushrooms
- 1 pkg Lawry's Spaghetti Sauce Mix
- 1 1/2 cup sour cream
- about 7 slices of provolone cheese
- 8 oz shredded mozzarella cheese
- 1/4 cup shredded parmesan cheese

And here's what I did:
1. To make the sauce, I browned and drained my ground beef, added the tomato sauce, puree, olives, mushrooms and seasoning packet. I then let that simmer for about 20 minutes, stirring occasionally. I preheated the oven to 350 degrees.
2. While the sauce was simmering, I boiled my ziti noodles al dente. Then drained them.
3. I greased a 9x13 baking dish, and put half of my noodles in the bottom. I then mixed in half of my sauce. After that, I evenly layered the sour cream on top. Next came the provolone cheese. Then another layer of noodles mixed with the other half of the sauce. On top of it all is the shredded mozzarella and parmesan cheese. 
4. I put it in the oven for 30 minutes, and it turned out perfectly bubbly and brown on top!

This made a huge amount of food. Probably 16-18 servings. I served it with a spinach salad, and garlic bread. It would be great for a get together or pot luck!

I hope you all give this a try- it's sure to be keeper.
We hope you all are having a great week! We will be back again tomorrow with a Thrifty Thursday post!
As always, you can see the parties we link to by visiting our Link Party Directory!

Tuesday, September 24, 2013

Starburst Candy Corn Party Favors! + FREE Printable

“I participated in a campaign on behalf of Mom Central Consulting for Starburst. I received product samples to facilitate my review and promotional item as a thank you for participating.”

Good morning everyone! Today I wanted to share with you some Fall/Halloween party planning ideas using Straburst Candy Corn! I am excited to give these little party favors out to the neighbors as a "Happy Fall gift". I've been saving these baby jars, not really knowing what I would use them for. I thought they would be perfect for this project. 
To start the Halloween season off with a "Boo!" Starburst candy and entertaining guru, mom and TV  personality, Tori Spelling, have partnered to create a variety of fun treats and decorations for Halloween. This is my spin on Tori's Candy Corn party favors. (Pictured Below)
TORI SPELLING and HER candy corn favors.
Send your guests home during the Halloween season with a tasty treat in a cute and creative container! Festive Favors can be displayed on an embellished tray for your guests to pick up as they leave your party, or as a part of a place setting. You can see step by step direction on this, and many other of her Halloween decorations and treats on the

Such as her candy corn cupcakes, and candy corn "BOO!" door hanger! Be sure to check it out. Wanna share these projects on twitter - use the hashtag #starburstcandycorn
TORI SPELLING - and her BOO! door hanger!
Here is a picture of my Candy Corn Party Favors!

Here is what you'll need:
-Baby food jars
-A couple bags of Starburst flavored Candy Corn 
-Small roll of burlap
-Mod podge
-Colored acrylic paint (red, orange, pink, and yellow)
Follow these Steps:
1. Paint the lids of your jars using the acrylic paint
2. Color code the candy and place in the jars
3. Using mod podge attach the FREE printable to the lid and apply a thin layer over the printable, as well.
4. Cut a thin strip of burlap and tie it around the jar (making a knot)
That's it! This project is super easy, fun, AND yummy. You better believe I sampled some of those candies, they're DELICIOUS!! :)
I hope you enjoyed this fun projects, and be check out the other fun projects using starburst candy corn and try one out for yourself! 
Have you ever used candy corn to decorate, or made a special fall treat?
 I'd love to hear about it! :)
Be sure to check out all the parties we link to at our Link Party Directory Page!

Friday, September 20, 2013

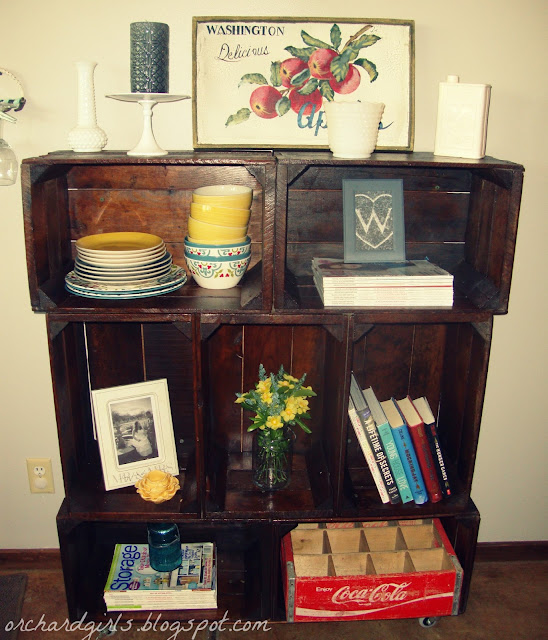
DIY: Apple Crate Bookshelf Reveal

This has been a long time coming! I have been wanting to build one of these for a while now. Okay, I take that back I have been wanting, my husband, to built one of these for a while. I finally found a decent price for crates on craigslist and Daniel went and picked them up for me! What a catch, that husband of mine ;)
DIY - Apple Crate Bookshelf - Orchard Girls
I was able to purchase seven different crates for $65.00. After doing a lot of research on crate prices, I thought this was a pretty good deal. Most crates I had seen were going anywhere between 12-20 dollars. This is the layout that we finally chose, after moving them around and playing with a few different patterns. 
Here a few instructions:
1. Pick your layout and lie the bins down evenly and screw them together,  
connecting two at a time.
2. Once all of them are screwed together, flip it over and measure out the back. Now you will need a thinner piece of wood - and using several screws attach it to the back (securing the bins in place)
3. Do the same with the bottom (centering both) (SEE PICTURES BELOW)
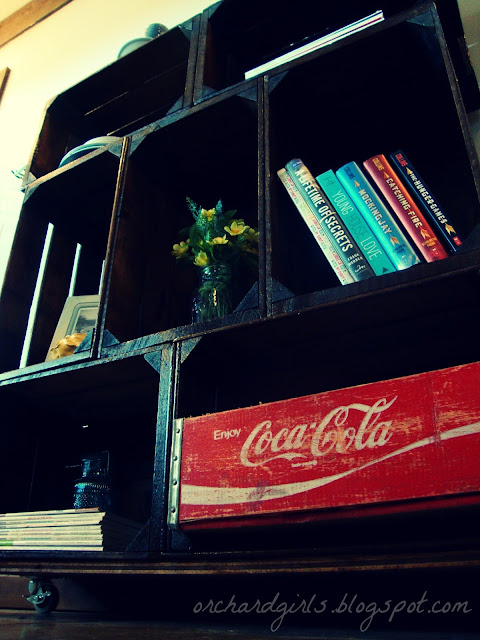
4. Next we purchased four wheels (with brakes) and screwed them to the bottom of the bookshelf.
DIY - Apple Crate Bookshelf - Orchard Girls
 DIY - Apple Crate Bookshelf - Orchard Girls

That is basically it, as far as putting it together. Next we used a 2 in 1 stain and sealer to coat the crates. They felt and looked a bit dirty so the stain and sealer fixed that right up! Here is the shelf after a coat of the 2 in 1 and another coat of plain polyurethane.
DIY - Apple Crate Bookshelf - Orchard Girls
 I love how it turned out. The back is a little heavier than the front, so locking the wheels and placing it against the wall prevented any tipping issues, however with little miss addie girl on the move we will be attaching it to the wall soon, to ensure it doesn't accidentally tip over. Here are a few pictures of it all set up inside!
DIY - Apple Crate Bookshelf - Orchard Girls
All items I already had but....
WHAT'S ON THE SHELF?
-Washington Apple Sign - Thrift Store ($7.00)
-Milk Glass - all thrift store finds
-Gray decorative candle (ross)
-Dishes - Shopko and Dollar Store
-"W" Frame - Printed out from computer and spray painted dollar store frame
-Wedding gift photo and tea light holder (Michael's)
-Mason Jar with Dollar store Fake flowers
-Random books
-Magazines and thrift store blue jar
-Vintage Coca-Cola crate ($15.00)
Can you tell I'm an avid thrifter? :)
DIY - Apple Crate Bookshelf - Orchard Girls


DIY - Apple Crate Bookshelf - Orchard Girls

DIY - Apple Crate Bookshelf - Orchard Girls
Please feel free to let us know what you think!? We love having your feedback. What is one project that you have been really wanting to do for a while, but just haven't had the time or money? Thank you for sharing with us!


As always, but sure to stop by our Link Party Directory to see where we link up to.

Thursday, September 19, 2013

Thrifty Thursday: Dollar Store Basket Weave Runner

Happy Thrifty Thursday. I have another Dollar Store project for you all today, though it didn't only cost me a dollar. It ended up costing me a whopping 6 bucks! Not too spendy, but a little more than I wanted to spend for this runner! Anyway, onto the project! A basket weave runner made out of Dollar Store "Magic Cover" which is described as Vinyl Top Liner. The pattern I bought is called Plaid Burgundy and Cream.
So, for this project, I needed 6 rolls of the magic cover. This is because I'm a dum dum and didn't read the dimensions of the roll- it's only 30 inches long. I then cut each of the rolls in half lengthwise, and cut 6 of those in half widthwise (?)... did anyone else learn "hotdog" and "hamburger?" So, cut each roll in half hotdog, and half of those in half hamburger. Make sense? The longer pieces will be put together to make 3 60 inch long pieces. Once the pieces were all cut, I did these steps...
1. I lightly taped the longer pieces together to get 3 60 inch strips. I lined these up.
2. I used the 12 smaller strips (upside down) to "basket weave" with the longer strips. Using my hot glue gun, I tacked each piece down on the corners. 
3. Once all the pieces were woven, I hot glued all of the outer edges, and trimmed off any excess.
4. That's it! No sewing required. Though, I might go around the edges with the sewing machine someday soon.
I think this turned out to be a pretty cute runner, it almost looks quilted to me. I'm excited to use it outside since it's really durable, and can be cleaned easily. 
Oh, and those apples in the last 2 pictures? I picked those out of my backyard. Our house is surrounded by Gala apple trees, and just a few Honeycrisp trees. What is everyone's favorite apple variety? They're out picking Golden Delicious right now!

We hope you all are having an amazing week. Kayla will be sharing an awesome project with you tomorrow- so be ready! I'm trying to convince her to make me one for Christmas. You never know, right?!

Always,
Check out the parties we link to by visiting our Link Party Directory

Wednesday, September 18, 2013

WWEW: Panda Express Orange Chicken - Copycat Recipe

Happy hump day! For our "What We Eat Wednesday" I will be sharing with you a copycat recipe for Panda Express: Orange Chicken. A definite favorite in our household. Typically, when I go to Panda Express I get the Sweet Fire Chicken with noodles. However, I know not everyone is a fan of the spicy stuff, so I opted for the orange chicken.
Panda Express - Orange Chicken (Copycat Recipe) - Orchard Girls
Now, this ended up being a last minute pick by the hubby and I, but we REALLY wanted it. Of course, we didn't have all the ingredients that we needed - and we're at least 20 minutes from the nearest grocery store. So we did the next best thing, went to the mother-in-law one stop shop! She, of course, had everything we needed :) 
Panda Express - Orange Chicken (Copycat Recipe) - Orchard Girls
Here is what you'll need: Chicken
  • 1 lb Chicken Breast (cut into various 1 inch pieces)
  • 1-2 cups Self-Rising Flour
  • 2 eggs
  • Oil for frying
Here is what you'll need: Sauce
  • 3-4 oz Orange Juice ( I just used frozen can of OJ)
  • 2 tbsp Soy Sauce
  • 3 tbsp Sugar
  • 1/4 cup Rice Wine Vinegar
  • 1/2 tsp. Siracha Sauce (I used a bit more - fan of the spicy!)
  • 1 clove minced garlic
  • 2 tsp. corn starch
Instructions:
CHICKEN: 1. Heat the oil in your frying pan to about 375 degrees (make sure you have enough oil to cover the chicken).
2. Preheat your oven to 200 degrees (It takes a while to fry the chicken so once you finish a batch you can put it in the oven to keep warm)
3. Wisk your eggs in a small bowl till fully mixed
4. Fill a bowl with the self-rising flour
5. Once you've cut your chicken into pieces - one or two at at time - dip into the egg bowl, then into the flour. Repeat twice to fully coat.
6. Once you have about 5-10 pieces put them in your frying vessel and let fry til golden brown (about 10 minutes-ish)

SAUCE: 1. Combine all sauce ingredients into a small pot (making sure the cornstarch is dissolved before cooking). 
2. Cook on medium heat until the sauce thickens.
LAST STEP - Place fried chicken in a large bowl - and pour the sauce on top, mix until the chicken is fully coated. Serve immediately - I also added a sprinkle of red peppers! ENJOY :) Serve with rice or noodles!
 (recipe adapted from - Rachel Rockwell)
Panda Express - Orange Chicken (Copycat Recipe) - Orchard Girls
If you don't have time to fry your chicken you could also just cook a bag of frozen popcorn chicken and make the sauce - either way you'll love this recipe! Let me know what you think? Have you ever tried to copycat a restaurant recipe? I'd love for you to share it with us here at Orchard Girls :)


Be sure to check our the parties we link to at our always-growing Link Party Directory!

Pinterest

Related Posts Plugin for WordPress, Blogger...