Friday, March 28, 2014

FREE Printable: Hospital Bag Checklist

Good Morning! Just a quick post today, but a fun one! A FREE printable for your pregnancy hospital bag. I should definitely have mine packed by now, at least for my own sanity. I am a little paranoid about not being prepared for when our baby boy arrives. Which stems from me not being prepared AT ALL when Addie surprised us and arrived 5 weeks early. Anyway, feel free to grab this printable. These are just the basic essentials that you'll want in your bag, however I'm sure there are a few other "nice to have" items you'll want to include, as well. 
I have a few things ready to go, but want to finish everything up by next weekend. When did you pack your hospital bag? Any items that you think are a MUST that should be included? Let me know! :)
And to be honest, I've been waiting on buying THIS bag to get started. Lol, pretty silly, but oh well! :) To follow-up I'll be back soon with a "Whats in my hospital bag" post!
Cute Hospital Bag

FREE Hospital Bag Checklist Printable #hospitalbag #pregnancy
CLICK HERE to download and print this checklist!

Thank you for stopping by! Be sure to check out all our other FREE PRINTABLES! Have a wonderful weekend.


Linking up to these parties HERE!

Thursday, March 27, 2014

Spring Clean Your Finances

Happy Thursday! Today I'm going to discuss the one thing that we all love to hate and hate to love. Money. Maybe it's just me, but I highly doubt it. It's the time of the year when we try to get our act together, after we've filed our taxes. What will we do with the refund? How will we pay back on our taxes?! How can we make sure this next year goes smoothly? How can we start saving? When will we ever pay off these credit cards?!
I know that we are in this mode right now. Actually, my husband and I are sitting down tonight to go over finances. We like to periodically do so, to make sure we're on the same page, and to make some short/long term goals in terms of saving or paying things off. It's really important to do this if one person is in charge of paying bills or watching the accounts. In our case, it's me. Hubby brings in the money, and I try my best to heedfully manage it. I work too, but not enough to count on any steady income, or to pay for much more than groceries/gas for the month.

Something that makes my life SO much easier is having our finances organized into spreadsheets. I've talked about this before in my post Create a Finance Binder + Free Spreadsheets. When we sit down to go over things, I'm able to pull these spreadsheets up. Also, Adam can open them and see what's going on at any given time. I update the spreadsheets several times a month, and do one big transition at the beginning of each year. Though, I have a binder with this information in it, I do not update it as frequently as I do the digital spreadsheets. For anyone looking to get organized, check out that post for some ideas.
Kayla has also done a really popular post on making a Monthly Bills Organization Station. Which is also a great resource for getting started. Be sure to check out the free printable she offers and the set-up she created.
Something else that will really help get a handle on things is to budget for certain categories. One place where we spend a lot of money is groceries. A few years ago, we created a monthly budget for our food based on our average spending. Well, our average spending minus some. I did this by tracking our groceries, and menu planning. I don't do this as much anymore, but plan to start up again in the very near future. I've written a post titled How to Start Menu Planning. I need to take my own advice and get back on that train!
So, there are some ideas to help you spring clean your finances. I know that I need to make sure that I'm staying on track, especially with the baby on the way. If anyone has any good budgeting tips or posts on babies/kids, please post them below in the comments! I'm pretty sure I'm going to need some help :)

I hope you are having a wonderful Thursday! One more day until the weekend, woowoo!

Linking to these parties.

Wednesday, March 26, 2014

WWEW: Link Party and Top 5 Fruit Smoothies to try this Summer

Good morning! I hope you're all having a great day. Welcome to our weekly Wednesday Link Party! First I want to share a few summer smoothie recipes. I was perusing Pinterest, and came across all these scrumptious looking fruit smoothies. I'd love to try all of these this summer!  
(These are not our recipes, so be sure to visit the original source and let them know we sent you!)

1. Mango Passion Fruit Smoothie from Laylita's Recipes
2. Blackberry, Banana, Mango, and Dragon Fruit Smoothie from Little Black Pearls
3. Raspberry Peach Banana Smoothie from Have a cup with Me
4. Watermelon Sherbert Smoothie from The Frugal Girls
5. Tropical Fruit Smoothie from My Baking Heart

Can't wait to try these smoothies out! Do you have a delicious fruit smoothie recipe? Be sure to share it in our party this week, along with any other yummy recipes. Now onto the party, first i'd like to share our featured recipe from last week's party.
Aloha Sliders by Dixie Chik Cooks
These look so delicious, she even made her own rolls! 
Be sure to check this out, can't wait to make these this summer.
Join the party by linking up any new or old recipes down below; Remember to only post about food! We would love if you shared our button with your readers so we can continue to have success with this weekly linky party! Thank You for linking up :)


Tuesday, March 25, 2014

DIY: Personalized Wood Blocks (for Nursery!)

Good Morning, everyone. Another week has begun. I'm 26 weeks along now, and I'm beginning to feel my third trimester sneaking up on me. I've been so tired, and having lots of growing pains. I wish that second trimester energy would have lasted a wee bit longer! Thankfully, I've gotten several of my nursery projects done. I still have a few more, but it's nice to have quite a bit finished already.

Another project I completed for the nursery are some wood blocks that I decided to decorate and put our baby boy's name on. We haven't officially announced the name yet, so I'm only showing a random letter :)
This was actually a really fun project! I loved picking out the scrapbook paper, so many to choose from.

Here are the supplies that I used:
- woodblocks, found at Michael's for around $1 a piece
- acrylic paint, mixed to different shades of green
- scrapbook paper, I used 5 different patterns
- map letter stickers, found at JoAnn's
- matte Mod Podge
- a couple of paint brushes
- a couple of paper plates

And here is how I did it:
1. Painted the edges of my blocks where I knew the paper wouldn't cover. Let them dry.
2. Figured out how many squares of scrapbook paper I would need. Basically need 6 squares for each block. Cut out the squares. Decided on placement of squares.
3. Put my sticker letters onto the squares I wanted facing forward on each of the blocks.
4. Mod podged the squares down to the block, and followed up with another layer over the entire block. Let them dry.
I know these are pretty self explanatory, but the process I used worked out well for me. I think these would be so cute as a gift for a baby shower! Actually, I'm already thinking about making more of them for some of my friends. I love that you can make them look so different with what patterns you choose.

I hope you all have a great rest of the day, and I will be back again on Thursday!

Friday, March 21, 2014

DIY: Adjustable Crib Skirt

Good morning, and happy Friday! I have a really exciting project to share today. Well, exciting for me because it finishes off my baby boy's crib! I've been looking for fabric to make a crib skirt, but hadn't really found any I liked. I was looking for a thicker striped fabric, but in a very neutral color. The fabric I ended up choosing was one I looked at what seems like forever ago, and even took a picture of to remember it. I saw it again in store and realized it would make an adorable crib skirt!
I wish I would have come up with this on my own, as it is PURE.GENIUS. But alas, I didn't. I did a search on good ol' Pinterest and found this tutorial from A View Along the Way. What I loved was that she had a Jenny Lind Crib and had already done the measurements for me. Double score. I started cutting my fabric (pain in the you know what), and realized my fabric was not wide enough to make the long panel. I had to add a small piece of fabric to extend it. Thankfully, it isn't too noticeable.
She attached her crib skirt with little tacks, but I didn't have that option. To be completely honest, I've gone the lazy route right now and just have masking tape holding it up. I plan on getting velcro strips in the very near future. I had another little mistake, too. I was so eager to get this done, I didn't pay attention to my thread color. It's a dark green. Oops. In the end, I actually liked the contrast.
Plus, it matches the quilt I'm making to go on the crib. Here is a little sneak peek.
I hope you all had a great week, and that your Friday goes quickly. We don't have big plans for this weekend, but are starting frost season around here. That means that the wind machines around our house are coming on during the night. So loud. We have one right behind our house, and it makes our windows rattle. They do this to raise the temperature just enough that the buds on the apple trees don't die. Super important, but not very pleasant.

Have an awesome weekend, guys!

We will be linking to these parties.

Thursday, March 20, 2014

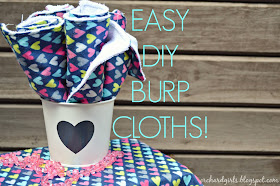
DIY: Baby Burp Cloths!

Easy DIY Burp Cloths
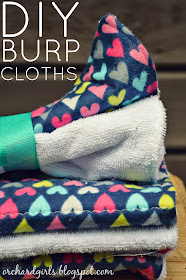
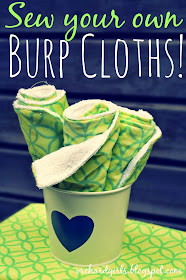
Today I wanted to share with you all an DIY project that I just finished. Super easy DIY Burp Cloths!! These are great. What I love most is that you can pick out any color/design fabric that you want! I mean, the possibilities are endless (probably the hardest part). Okay, so if you've been reading our blog you know that I am new to the "sewing scene", but even I could do this project. 
I followed a wonderful tutorial by MJ over at AmusingMJ. Her step by step tutorial was so helpful, and was very easy to follow. So hop on over there to get the step by step process. But here are how mine turned out.
Easy DIY Burp Cloths

Easy DIY Burp Cloths
 The cloths above are going to be a baby gift for my friend who just had her baby! I am so excited to give them to her, and hope she loves them! The ones down below are for my little man, when he arrives! My mother-in-law made burp cloths for me when Addie was born and they ended up being our favorite ones!
Easy DIY Burp Cloths
 I hope you'll give these are try, and when you do, let me know how they turn out and share with me some pictures so I can see what fun fabric you chose!! :) Also, these end up being super cheap and thrift - much better than store bought cloths. Especially if you use coupons from JoAnns!


Linking up to these fun parties HERE!

Wednesday, March 19, 2014

WWEW: Link Party & Vegetarian/Vegan Chickpea Sandwich Spread

Good morning! Welcome to another What We Eat Wednesday. Today, I will be sharing a really yummy and healthy recipe. We love chickpeas in this house, but I've never tried to make a sandwich spread out of it before. Think egg salad or tuna salad. I think I may even like this more than those!
Here's what I used:
-1 15oz can of garbanzo beans/chickpeas, rinsed & boiled for a few minutes
-1 stalk of celery, finely chopped
-about 1/3 a red bell pepper, finely chopped,
-1 to 2 Tbs mayo (could substitute a vegan version of this)
-1 Tbs lemon juice
-1/2 tsp garlic powder
-1/2 tsp onion powder
-1 tsp dill weed
-salt and pepper to taste

Here is how I made it:
-I boiled and mashed my chickpeas. Then mixed in all the other ingredients. It gets better the longer it sits in the fridge, so I left mine for a few hours before dinner.
-Serve with pita bread, plain ol' bread, crackers, etc... SO YUMMY!

And now, onto this week's LINK PARTY!

First, I'd like to feature my favorite link-up from last week.
Irish Soda Bread with Raisins from A Mother's Shadow!
I know that St. Patrick's day has come and gone, but I love soda bread all the time! I'm planning on making this VERY SOON!

Here's the link up for this week! Feel free to post a few of your favorite recipe posts. Make sure you check out Alexis over at Laugh.Eat.Learn, too! Have an awesome day, guys.


Tuesday, March 18, 2014

DIY: Modern Arrow Fabric Wall Hanging

Good afternoon! I hope you all had a great weekend. We were able to go to the westside, and visit with my family for a few days. It is always fun to go over there and visit, it feels like a little mini-vacation :) 
My "nesting" instinct is kicking in, and I've been loving my new sewing machine - and teaching myself how to use it. This is something I came up with for our baby boy's nursery. I am going with some type of "arrow theme." Anyway, here is a wall hanging that was pretty easy - and it turned out pretty good.
It was pretty easy to make - it is (obviously) no where near perfect, but that's okay - it gives it more of a home-made special look. Here are a few pictures and steps if you'd like to make your own!
1. I used felt for the arrows. I picked a few different coordinating colors and cut-out my different arrows. They're all different shapes/sizes.
2. Once I cut out my arrows I sewed them onto a piece of ribbon. I just sewed a straight line along the length of the ribbon, placing an arrow every few inches (sewing it to the ribbon)
3. Once I sewed all my arrows to the strips of ribbon (I did 9 rows of arrows) - I cut a rectangle out of a plain piece of snuggle fabric. (you could use any type of fabric- that is just what I had on hand) I just made sure each side was straight and made sure it was big enough for all the arrows. Now, I didn't really measure anything for this project, besides the length of each ribbon. 
4. Next, I ironed the felt arrows on the ribbons and ironed the gray back piece of fabric. While ironing the gray back piece I folded over the edges and ironed, pinned them, (preparing to sew the edges - for a cleaner look)
This will be the side that is facing the wall (you won't see it)
5. I then sewed the edges of the gray back piece of fabric, giving it a nice hemmed looking edge. 
6. Next I pinned the arrows/ribbon to the gray fabric (one row at a time) and sewed a straight line down the ribbon along the gray fabric. 
7. Once all the ribbons were attached to the gray fabric, I went back and sewed a line on both sides of the ribbon/arrows, so that the edges of the arrows would stay down and not bend over. Also adding a bit of extra stitching. Then, I cut off all the extra string and ironed the whole piece,and hung it up!

There you have it, if those directions seem confusing - its probably because they are! Lol. If you have an questions or don't understand something let me know, and I will do my best to better explain it! What do you think? This project is fun, because you could really do it for any type of themed room. Hearts for a little girl? Sports balls for a little boy? Anything you can cut out of felt! 
Have a wonderful evening, and be sure to stop by again tomorrow for our growing What We Eat Wednesday Link Party! :)
Linking this post to THESE lovely parties!

Friday, March 14, 2014

Kayla: 30 Week Pregnancy Update & Bump Picture(s)

Happy Friday everyone! How are you all doing? It looks like it is going to be a beautiful day here on the orchard. It is already sunny and almost 50 degrees. I just got back from my doctor appointment. Switching to every 2 weeks now! I had to tell him about how I'm a bit paranoid that our little baby is going to come early - which is only based off that Adeline came early. I haven't had any signs of labor and am sure everything is fine, like I said, I think I'm just being paranoid. Anyway, he said everything looked fine!
This is a picture from last week (30 weeks). Tomorrow I will be 31 weeks. 
Now just for comparison sake - here is a picture of me pregnant with Adeline at 30 Weeks. See any noticeable differences? I'm not quite sure I do...
This is me pregnant with Addie at 30 weeks (2012)
How far along: 31 weeks tomorrow
Total weight gain/loss: so far, I have gained about 8lbs
Maternity clothes: Yep! Shirts and pants! Just ordered a maternity Maxi dress from Old Navy, too.
Stretch marks: ahhh, unfortunately, yes.
Sleep: The past few days have been rough. It takes me forever to fall asleep, and last night I was up about every hour to pee! And I've found myself waking up really early and not being able to fall back asleep. Guess my body is getting ready for when the baby arrives and I get no sleep. Lol.
Best moment this week: Just being able to look down at my belly and watch our little guy move and groove!
Movement: He's a strong one...
Food cravings: chocolate!
Gender: BOY!
Labor signs: Nope, not yet!
Belly button- in or out?: In, and I don't think it has any plans of popping out.
What I miss: Hmm, nothing comes to mind.
What I am looking forward to: Just hoping this warm weather sticks around, I've been loving it! 
Milestones: Hmm, I think we have everything ready that we'll need right away. I just want to get my hospital bag, and the baby bag ready in the next week or two!

Have any fun plans for the weekend? We get to visit with some family, so I am excited for that! :)