Friday, August 30, 2013

7 Easy Fall Crafts

Happy Friday! Today I'm going to share some cute Fall crafts that I've come across via Pinterest. I'm planning on doing all of these projects this Autumn and hope you all will join me! Feel free to link up any fall projects you've done in the comments- I'd love to come check them out.


(From left to right, top to bottom)
1. Canning Jar Pumpkin- I couldn't find a direct link to this project. It looks pretty simple though. Just some canning jar rings tied together in the middle with a clothespin for a stem!
2. Dollar Store Fall Garland- I made this last week and absolutely love it! I planned on taking it down after I took the pictures, but it is still hanging in my kitchen!
3. Hometown Pride Pumpkins- These painted pumpkins are so cute! Plus, they will last longer.
4. Pumpkin Spice Sugar Scrub- I love making my own scrubs, and this one sounds delicious! I'm so excited to make this and share it with family and friends.
5. Fall Candle Centerpiece- This looks like an easy to assemble centerpiece that won't break the bank!
6. Raffia Wrapped Vase- I love this idea! I have lots of raffia and sad little vases waiting for this project. Plus, it's a dollar store project!
7. Fall Leaf Initial- This would be really cute hanging on my front door! 

I hope I inspired some of you to get crafty this weekend! We hope you have a great one, and we will be back with more fun projects next week.
Check out our Link Party Directory to see the parties we link to!

Thursday, August 29, 2013

Thrifty Thursday: Decorating with FREE Printables

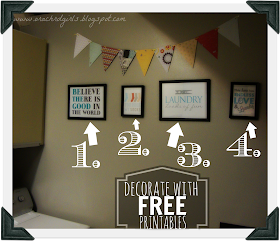
Thrifty Thursday is back again! Today I have a super thrifty thought for you. I wanted to share with you how I use FREE Printable to decorate. If you have an empty frame lying around - search for a free printable (there is bound to be one) to match, or go with the theme of the room you are trying to decorate. There are tons of printables for bathrooms, laundry rooms, kids rooms, kitchens, etc. Here is how I used free printables to help decorate my laundry room.
Decorating with Printables - Free Laundry Room Printables
I used the above free printable to help decorate my laundry room. All I did was go to Pinterest and search for "laundry room printables" Here is a link to each of these printables so you can print them if you'd like!
Decorating with Laundry Room Printables
ONE  ~  TWO  ~  THREE  ~  FOUR
These are just a few of the ones that I really liked, so I printed them out - put them in dollar store frames and hung them in my laundry room! Such a quick, easy, and CHEAP way to decorate. 
These next printables are awesome! These are such a "steal" from RedFlyCreations. She took these pictures and made the file available to anyone, for FREE! Here are the ones I printed out...
Mason Jar Printables
You can find these FREE Mason Jar Images at Redfly Creations!
I used Shutterfly to print these beauties out, and put them in some nicer frames. Shutterfly is always having deals and discounts. I found a discount for 8x10 pictures and printed these ones out (with FREE shipping). I haven't decided where I want to hang them yet. I am thinking the guest bedroom? I'm not sure...Anyway, aren't they gorgeous? 
AND here is another way I used FREE Printables to decorate! This time in the bathroom...
You can see all about this bathroom redo AND 
get the links to these free printables by visiting our post Dollar Store Bathroom Redo
Be sure to check out our FREE PRINTABLES TAB as well so you don't miss out on any of the free printables that we have made here at Orchard Girls.
Have you ever used a free printable to decorate? Please do share!
Stay thrifty my friends,
Check out which parties we link to at our Link Party Directory.

Wednesday, August 28, 2013

WWEW: Burrito Lasagna

Hey everyone! Welcome to What We Eat Wednesday. Today, I'm going to share a super easy and tasty weeknight meal. We always seem to be eating tacos and burritos around here. They're a trusty stand-by. I wanted to try something a little different and stumbled across THIS RECIPE from allrecipes.com. It's almost easier than tacos, and the leftovers are much easier to transport and eat at work. 

I really didn't change anything from the recipe, so I won't bother typing out all of the ingredients. The only thing I added was about 1/2 tsp of chili powder, oregano, and cumin. Also, I doubled the olives and the amount of tortillas used. So, I used a total of 4 tortillas in my middle layer.
If you end up making this recipe as is, it will make TONS of burrito lasagna. I suggest making 2 separate dishes out of the prepared ingredients. That way you can have one for dinner, and freeze the other one (in a foil/metal pan) and eat it another day! 
There you have it! A tasty weeknight meal that doubles up for use on a future busy day. :)

Hope you enjoy your Wednesday,

Check out the parties we link to by visiting our Link Party Directory.

Tuesday, August 27, 2013

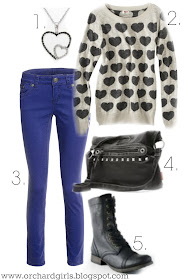
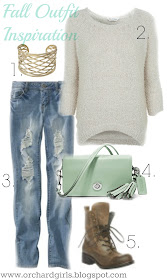
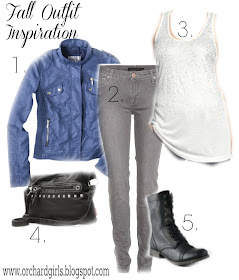
Fall Outfit Inspiration #2

Fall Outfit Inspiration (Click for sources)- Orchard Girls
Hello everyone! Seemed like a lot of you enjoyed my first post on Fall Outfit Inspirations, so I figured I would try another similar post. However, with these outfits I will be including a source link with every piece! I know it can be frustrating finding a "pin" on pinterest and clicking it, only to find it leads to no where. NOO!! Anyway, here are a few outfits I put together to give you some inspiration for fall. ENJOY! 
Fall Outfit Inspiration (Click for sources)- Orchard Girls
ONE  -  TWO  -  THREE  -  FOUR  -  FIVE


Fall Outfit Inspiration (Click for sources)- Orchard Girls
 ONE  -  TWO  -  THREE  -  FOUR
Fall Outfit Inspiration (Click for sources)- Orchard Girls
 ONE  -  TWO  -  THREE  -  FOUR  -  FIVE
Fall Outfit Inspiration (Click for sources)- Orchard Girls
ONE  -  TWO  -  THREE  -  FOUR  -  FIVE
Fall Outfit Inspiration (Click for sources)- Orchard Girls
ONE  -  TWO  -  THREE  -  FOUR  
Well, I hope you're inspired for fall! Let me know what you think about the outfits. Do you have a favorite? I hope you all  have a wonderful day! If you enjoy these types of posts be sure to check out 

Be sure to stop by our Link Party Directory Tab - to see where we will be sharing this post! :)

Friday, August 23, 2013

Dollar Store Fridge Makeover + FREE Printable Labels

Good Morning! Its Thursday Friday! It's been "one of those" weeks. I'm pretty worn out, but looking forward to the weekend. Today I wanted to share with you all a great way to get organized -
with my DOLLAR STORE FRIDGE MAKEOVER - Okay, so...not so much a makeover, but an organized fridge - which pretty much feels like a makeover :)
Kenzie and I went to the dollar store, and while we were there, we came up with the idea of posting about organizing your fridge, and well, mine needed...BAD! I'm actually pretty embarrassed to show you guys these "before" shots. But here goes nothing....
 

We'll just keep those smaller! Lol. While at the dollar store I picked up several random sized bins/buckets to help separate and organize the fridge. Then, I created some fridge organization labels. I made these labels into PDF files, if you'd like to print them out for yourself. You can find them under our FREE Printables Tab.
Here is what I used!
 I used 10 different bins, the labels I made, and some vinyl non stick shelving liner
(from the dollar store, too!) Next I used to mod  podge and various scrapbook paper to apply the labels.
Easy Peasy!
Next came the boring part of actually cleaning out my fridge, and getting rid of a few things, etc...Anyway, this is what I ended up with. A pretty empty fridge BUT an organized one! :)


Anyway, there you have it! A cleaned out and organized fridge, all for about 7 dollars! Can't beat that ;)
Feel free to print out our FREE LABELS and organize YOUR fridge. It actually feels pretty nice. Thanks for stopping by. Leave a comment and let us know what you think. 
Do you have any other fridge organization ideas?
Have a wonderful weekend,
As always, be sure to check out our growing
 Link Party Directory to see where we party! :)

Thursday, August 22, 2013

Thrifty Thursday: Dollar Store Fall Garland

Happy Thursday! I have a super fun, easy, AND cheap fall project to share with you today! I picked up a few things at the dollar store the other day, hoping to be inspired. I bought a pack of their leaf doilies- 32 to a pack. I then remembered that I strung these doilies on string last year to make a really pretty and delicate garland. So, I decided to do it again this year- but with a little something extra.
Here are the supplies I used:
-dollar store leaf doilies
-dollar store natural raffia
-acrylic paints
-letter stamps
-paint brush/sponge
-paper plates, paper towels, and a small cup of water

And here is what I did:
1. Divided up the doilies. They kind of clumped together, and I just went with the clumps. I didn't separate each individual doily- they are really really thin! So, each clump probably has 4 to 5 doilies in it. 
2. Mixed my paint colors. Painted it onto the stamps and stamped each doily with alternating colors.
3. After the paint dried, I strung each leaf onto 2 strands of raffia (tied together in the middle). The end!

This is one of my favorite projects I've done recently! It turned out so cute- and you really can't beat the price! It also gets me in the mood to put up my fall decorations.
Let us know, when do you put up your fall decorations? I don't want to be too early, but I'm so ready!

Hope you all are having an amazing day!

As always, check out our Link Party Directory to see the parties we link to!
Wednesday, August 21, 2013

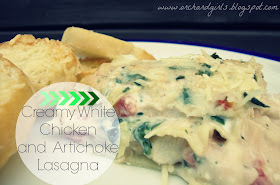
WWEW: Creamy White Chicken and Artichoke Lasagna

I've spent the past few days searching through recipes for today. I saw the picture for this recipe and KNEW it was the one I wanted to make. Creamy White Chicken and Artichoke Lasagna! Doesn't that just make your mouth water? When I told Kenzie what I was making for today, she nonchalantly asked if there would be leftovers. Lol. Instead, I just invited her and Adam over to enjoy it with us! :)
Creamy White Chicken and Artichoke Lasagna - Orchard Girls

Here is what you'll need:
  • 2 large cooked chicken breasts (cut into small pieces)
  • 1 can (14 oz.) Artichoke hearts (drained and chopped)
  • 1 pkg (8-16oz) Shredded Mozzarella Cheese
  • 1/2 cup grated Parmesan Cheese
  • 1 cup cooked/drained spinach
  • 1 can (14oz) Italian Diced Tomatoes
  • 2 pkg (8oz each) Cream Cheese (softened)
  • 1 cup milk
  • 1 tsp. garlic powder (or minced garlic)
  • 1/4 cup tightly packed fresh basil (chopped) - divided
  • 12-16 lasagna noodles, cooked
    Creamy White Chicken and Artichoke Lasagna - Orchard GirlsCreamy White Chicken and Artichoke Lasagna - Orchard Girls
Directions:
  • Preheat oven to 350 degrees
  • COMBINE cooked chicken, artichokes, 1 cup mozzarella cheese, Parmesan cheese, spinach, and diced tomatoes.
  • In a separate bowl COMBINE cream cheese, milk, and garlic powder. Mix until well blended, then add 2 tbsp of fresh basil.
  • Add half of the Cream Cheese mixture to the chicken mixture.
  • Spread a thin layer of the cream cheese mixture to the bottom of a 9x13 baking dish.
  • Lay 3 noodles down and spread 1/3 of the chicken mixture over them + mozzarella cheese.
  • Repeat layers of noodles and chicken mixture two-three times.
  • Top with remaining noodles, remaining cream cheese mixture and mozzarella
  • BAKE 25 minutes or until heated through. 
  • Sprinkle with Parmesan Cheese and any remaining basil; Let stand 5 minutes before cutting to serve. *Recipe modified from Tasty Tidbits*
Creamy White Chicken and Artichoke Lasagna - Orchard Girls
This is a great dish to make for a weeknight meal - although I will say it takes a bit of prep work. To make it easier it would be a good idea to make ahead - or even make ahead and freeze. I hope you give it a try - and if you do, let us know what you think! 
Have a wonderful Wednesday,
 P.S - Be sure to check out all of the parties that we link to, at our always-growing Link Party Directory!

Tuesday, August 20, 2013

How to Clean Wax Out of Candle Jars

Obviously, Kayla and I are ready for Fall. One of the things I'm planning on doing for decorations this year is filling jars up with fun things like acorns & candy corn. I knew I didn't want to end up buying jars, so I decided to start cleaning out some of my old candle jars. It occurred to me that it might make a helpful post for you all! I've tried several different methods for cleaning wax out of jars, and this by far the easiest I've tried! 

Here are the supplies I used:
- paper towels
- plastic bag
- used candle jars
- pot of boiling water

And here is what I did:
1. I laid out my plastic bag. I used this for dumping the melted wax in- it makes for easy cleanup. 
2. Brought the water to a boil and turned it down to medium heat.
3. Plopped the candle into the boiling water.
4. I let it boil for about a minute, and watched the edges of the wax start to melt. I then poured the melted wax into the plastic bag. A large chunk of unmelted wax should pop out pretty easily. If it doesn't, just keep putting it back in the water until it does.
5. Then I took my paper towels and wiped out the inside of the jar while it was still pretty hot. I used a pot holder to hold the bottom of the jar.
6. I repeated those steps for each of my jars and now I have some more pretty jars to use in my decorating!
I showed how I use old candle jars as Memory Jars, but there are so many other things to do with them! 

Also, here is the video I watched on how to do this method. It was really helpful to watch before I tried this for the first time! 

I hope you guys are having a great week!

As always, please check out all of the linky parties we link to by visiting our Link Party Directory!

Friday, August 16, 2013

Daily Time Block Notepad w/ FREE Printable

Happy Friday! I've been hearing about time blocking lately. Basically, you put your daily to-do list on a timetable- so certain things are done at certain times. I thought this would be an awesome idea for my "cleaning" days. I usually spend 1 day a week cleaning- and it just so happens to be Fridays. I'm one of those cleaners who is all over the place. "Time to clean the bathrooms... Oh, I need to re-stock my toilet paper first! Oh, might as well do the paper towels, too! This closet is a mess!" Anyway, time blocking has definitely helped me get everything done... with time left to spare!
These are usually more detailed! Like "do the dishes/wipe down counters" instead of "clean kitchen."
Here is how I made my notepad:
1. Printed off my free printable 2 to a page. Picked out a scrapbook paper to act as "binding."
2. Cut my pages in half. Cut a piece of thick card stock to size.
3. Used a heavy duty stapler to "bind" the top.
4. Added the scrapbook paper (cut to size) using packing tape. You could also glue it. I know this won't last forever- but that's okay with me. You also can't tear the pages out very well. Meh.

I hope you all have an amazing weekend! Anyone have any big plans?
We will be back to share more fun projects on Tuesday :)
Be sure to check out the parties we link to in our LINK PARTY DIRECTORY