Thursday, October 31, 2013

Thrifty Thursday: Necklace Hanger from Coat Rack

Hey all! Welcome back to Thrifty Thursday. A couple of weeks ago, I found a pretty dirty small coat rack. It needed a little bit of cleaning, but the rest of it was good to go. I really loved the wood, and the fact that I could easily personalize it whenever I felt the need. I had been looking for something to hold my longer necklaces, and it ended up working out perfectly.
Basically all I did was scrub it down with disinfecting wipes, and cut out some scrapbook paper I already had. 

I'm planning on making a little area with my jewelry boxes, my new necklace hanger, and a mirror. I don't wear enough of my jewelry because I can never see it. I feel like I would wear what I have if it was displayed.
That's it! Keep a look out for pieces like this. They can be really versatile. I was thinking it would be cute to put pictures of the doggies into those slots, and hang up their leashes. Maybe even a kitchen inspired scrapbook paper and hang up my aprons? 

Only one more day until Friday- you can do it! Oh, and Happy Halloween!
Have a great Thursday,

Wednesday, October 30, 2013

WWEW: Bacon Wrapped Water Chestnuts!

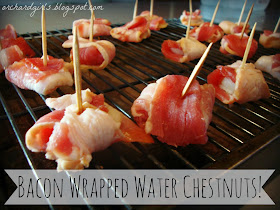
Good Morning everyone. For "WWEW" today, I will be sharing a recipe for Bacon Wrapped Water Chestnuts! These are so delicious!
Bacon! Orchardgirls.blogspot.com
Below is the recipe adapted from allrecipes.com
Ingredients:
-1 cup ketchup
-1 cup brown sugar
-1 tsp worcestershire sauce
-16oz sliced bacon
-2 (8oz) cans water chestnuts
Bacon Wrapped Water Chestnuts by OrchardGirls
 Directions: 
**soak your toothpicks for about 20 minutes prior to making your wraps so they don't burn**
1. Preheat oven to 350 degrees
2. Wrap bacon around a single water chestnut - and secure with a toothpick.
3. In a sauce pan heat to boiling - ketchup, brown sugar, and worcestershire sauce and simmer.
3. Lay your bacon wraps on a open wired baking sheet with a pan underneath it (for the grease to drip) (Pictured below...)
Bacon Wrapped Water Chestnuts by OrchardGirls
4. Once your bacon wraps are laid out on the baking sheet, using a spoon spread the sauce mixture over the wraps. 
5. Bake in preheated oven til bacon is fully cooked (about 45 to 50 minutes)

Bacon Wrapped Water Chestnuts by OrchardGirls
They are pretty easy to make they just take quite a bit of time to cook. These make great appetizers before a fun dinner or they're great to eat during the "big" game! 
What's YOUR favorite bacon recipe??
I'd LOVE to add some to my recipe book, comment below :)
As always, check out where we party at our Link Party Directory Page

Tuesday, October 29, 2013

3 Cute Ways to Stash Your Tea

Hey everyone! How are you all doing?! I'm sitting here cuddled up with a hot cup of tea, listening to the Seahawks game and the wind blowing outside. I sure love fall! I also love tea. I'm kind of a tea-o-holic. I drink a cup in the morning, afternoon, and night. I've never been a coffee girl, so tea feeds my slight caffeine addiction. 

I've tried several different ways of storing my tea. I like to have it handy all the time, but I don't just want the bags laying around. Here are 3 cute ways that I personally love.

First off, here is what I'm currently using. I got this little tea cup basket as a gift from Kayla for my birthday. I've been using it ever since!
I also use this vintage tin to store extra bags that don't fit in the basket.
And last but not least is this cute wall sconce that my Mom found at the thrift store for $1.99! It would be PERFECT for storing some tea bags and holding your favorite mugs. I would have never thought to use something like this for holding tea!
 So, there you have it. A few ways to spruce up your tea routine.
I really like drinking tea out of clear mugs. I'm not quite sure why, but I love being able to see the tea through the mug. These ones are from Bed, Bath & Beyond. 

I hope you all are having a great week so far. I can't believe that Halloween is already almost here! This fall is flying by! 

Talk to you all soon,

Check out the parties we link to by visiting our Link Party Directory.

Friday, October 25, 2013

Jewel Toned Room Mood Board

Happy Friday, everyone! I've been planning out what I want to do with an extra little room we have in our house. It would be the perfect size for a nursery, but not really large enough for a proper guest room. And since we aren't expecting any babies for a while, I decided to just do what I wanted with the room. I've always loved rich jewel tones, but have been scared to use them throughout my house. I decided to go for it in this little room that will act as our library/small guest room.

Here's the mood board I made to help sort my ideas:
And here are links to every piece:

So, there you have it! I'm sure the first thing I will do is paint the room. And I'm really loving that sophisticated Chelsea Gray. Also, I'm planning on thrifting a lot of these pieces, or making them myself. It will be a project of love. :)

If you like mood boards, be sure to check out the other ones we've made. Kayla made a Patio Moodboard, and I've made a Living Room Mood Board and a Laundry Room Mood Board.

We hope you all have an amazing weekend and we will talk to you again next week,

You can see the parties we link to by visiting our Link Party Directory

Thursday, October 24, 2013

Thrifty Thursday: $12 Bookshelf TWO Ways + Thrift Store Finds!

Kenzie, Addie, and I spend the day thrift store shopping. The works, Goodwill, Salvation Army, and two other antique stores downtown! Goodwill was a bust - Salvation Army too and I found one item (pictured below at one of the antique stores - A keys and change holder)

We ended up at Target, of course! This is where I actually hit the jackpot, when looking through the clearance section. I found a solid wood bookshelf in espresso color - normally $80.00 on sale for ONLY $12.00!!! Kenzie came over and helped me put the shelves together. I found two different ways I could use this dresser. 
#1
#2
My favorite part!!
Well, that's all I have for you guys today. What do you think? 
What would YOU do with this shelf?
Check out where we link up by 
visiting our Link Party Directory!

Wednesday, October 23, 2013

WWEW: Pumpkin Fluff Dip

Hey all! I found this recipe on allrecipes.com, and decided to give it a try. It turned out really well, and was SUPER easy and quick. It would be a perfect addition to any Harvest/Halloween party. Plus, I'm already thinking of all the other things I could use this dip for.
And it only has 4 ingredients and makes 4 cups!!
1. 16 oz container frozen whipped topping, thawed.
2. 5 oz package instant vanilla pudding.
3. 15 oz can of pumpkin.
4. 1 tsp pumpkin pie spice

The directions are really hard though, it was almost a deal breaker for me.
1. Mix it all in a bowl. 
2. Chill until ready to serve.

All done! We ate it with some shortbread cookies and graham crackers. I'm also going to try it with apples. Here are a few more ideas I came up with for using this dip:
1. Put it between cookies to make sandwiches. 
2. Freeze said sandwiches for a pumpkin icecream sandwich.
3. Mix a tablespoon in with your coffee, or hot cocoa.
4. Use it as a light frosting on a cake or cupcakes.
I hope you guys give this a try. I just made a half batch to try out, and it is plenty for us at home. It might just be a new fall tradition :)

Blessings,
Check out the parties we link to by visiting our Link Party Directory

Tuesday, October 22, 2013

Top Girl's Birthday Party Ideas!

Adeline is going to turn one in just over a month! I've started "pinning" cute birthday ideas for her party. People are so creative! I doubt I will be able to pull anything off as extravagant as these ladies, but whatever we end up with I'm sure Addie will love it and have a blast. Here is a roundup of a few of my favorite ideas for girl's birthday party invitations and decor!

To start off these are my two favorite invitations - I showed these to Daniel, and am going to have him design Adeline's invitations. I'll be sure to share them after her party :)
Both of these lovely invitations are from Tiny Prints!
Now, on to the decor! 
I love the colors in these theme from party-wagon, as well as the cute little suitcases used as a cake stand, so fun!
This is a cute a simple party table with an adorable picture cake from OurLifeisBlessed
High chair decorations from this pink ombre party
Fun Elephant themed party!

Great DIY idea for hanging tissue pom balls!
I love the idea of using this old window with the "One" and the bunting from Jenny Cookies!
Fun suckers on a foam ball! Not sure of the source for this piece.
One of my favorites is the hanging cupcake liners! They come in so many different fun colors and designs. Definitely want to do this one from AnderSruff
Such a fun/girly dessert table, and the drinks look so cute too, from Baby Life Styles
This post is full of cute a THRIFTY birthday party ideas! From A Bubbly LIfe
I want to do this one too, using mason jars with cute straws for drinking cups from A thoughtful place blog.
Those are some of my favorite ideas - I can't wait to plan Addie's party and share with you what we end up doing. Do you have any girls birthday party ideas or pictures? I'd love to see!! Comment below...
I will be linking up at these parties HERE!

Friday, October 18, 2013

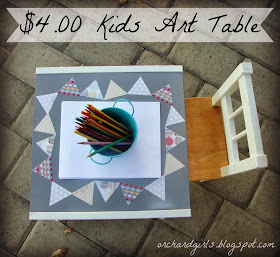
$4.00 Kid's Art Table!

It's Friday! WOO HOO! I am excited for the weekend - we don't actually have any plans, which I'm kind of excited about. No plans =  a mid-afternoon nap (at some point), netflix, if we get really crazy maybe a trip into town! HA. Anyway, today I wanted to share with you a quick and fun project I did this week. 
DIY - Kid's Art Table by orchardgirls.blogspot.com
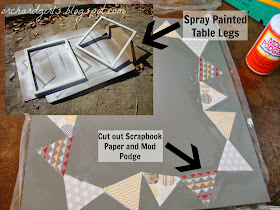
I found this RE "accent table" at Target, on clearance, for $4.00. Now, mind you it was gray (as seen above) BUT the legs were neon yellow (seen below)
DIY - Kid's Art Table by orchardgirls.blogspot.com
At first, I thought what am I going to do with a neon yellow and gray accent table? But it was only $4.00! So, I got it. Then, I thought maybe I could turn it into some type of art table for Adeline, for when she gets a little bit bigger. This DIY was super easy, and the only thing I paid for, was the actual table.
DIY - Kid's Art Table by orchardgirls.blogspot.com
First, I spray painted those neon yellow table legs! Next for the table top, I chose some coordinating scrapbook paper and cut them into triangles. Next I laid them out on the table is a type of bunting pattern, and used mod podge to secure them. After the mod podge was dry, I used a thin layer of polyurethane to protect the table top and cover the paper. 
DIY - Kid's Art Table by orchardgirls.blogspot.com
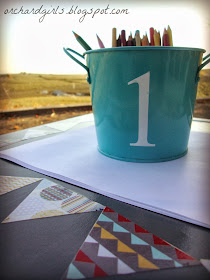
I put the table together and put a bucket we already and with some color pencils and paper on top. Even though Addie cant necessarily color yet, she still wanted to try it out! You can tell by her face that she loves it!
DIY - Kid's Art Table by orchardgirls.blogspot.com
Well, I hope you enjoyed this quick DIY and maybe it will inspire you to make your own. The possibilities are endless! :) Have fun.
DIY - Kid's Art Table by orchardgirls.blogspot.com
I hope you have a wonderful weekend,
Be sure to check out our Link Party Directory to see where we party.